Below you will find many of the questions we are frequently asked about Dynamic Plastics and our services. Click on a question to display the response. If you don’t see your question listed below, please feel free to contact us directly.
Basic Resin Guide
Although Dynamic Plastics does not recommend the type of resins to be used by our customers, we are happy to provide you with a basic resin guide to outline some of the more popular resins and some of their characteristics. Click on the resin type below to get additional information.
If you’d like to get more information about specific resins, we have provided links to resin suppliers for your convenience.
Advanced Elastomers:
www.santoprene.com
Bayer Plastics:
www.plastics.bayer.com
Chase Plastics:
www.chaseplastics.com/tech-info.html
Dupont Plastics:
www.dupont.com/Plastics/en_US/index.html
Entec Plastics:
www.entecresins.com
Polyone Distribution:
www.polyone.com
RTP Plastics (Compounder of Custom Blends):
www.rtpcompany.com
Brand Names: Santoprene
|
|||||||||||||||||||||||||||||||
Brand Names: Huntsman, Styron
|
|||||||||||||||||||||||||||||||
Brand Names: Hival, ProFax
|
|||||||||||||||||||||||||||||||
Brand Names: Entec, Lexan, Makrolon
|
|||||||||||||||||||||||||||||||
Brand Names: Bay Blend, Cycoloy
|
|||||||||||||||||||||||||||||||
Brand Names: Crastin, Rynite, Valox
|
|||||||||||||||||||||||||||||||
Brand Names: Crastin, Celanex, Valox
|
|||||||||||||||||||||||||||||||
Brand Names: Capron, Celanese, Zytel
|
|||||||||||||||||||||||||||||||
Brand Names: Capron, Celanese, Zytel
|
|||||||||||||||||||||||||||||||
General FAQ
Below you will find many of the questions we are frequently asked about Dynamic Plastics and our services. Click on a question to display the response. If you don't see your question listed below, please feel free to contact us directly.
Although each case is different depending on part geometry among other things, a good estimate is usually about a 30 percent difference in tooling cost.
No. Our guaranteed tool life is just the point we anticipate the tool will need reworked in order to continue providing high quality plastic parts. The rework cost is generally far less than the original cost of the tooling, and will often extend the tool life by the original amount that was guaranteed.
The amount of parts a mold is able to produce will vary based on a number of factors (such as part geometry and whether the resin used is filled or unfilled with glass or other additives). A typical range for an aluminum tool with unfilled resin would be 50,000 to 100,000 pieces, or 5,000 to 20,000 pieces when a filled resin is used. For P-20 tooling using an unfilled resin the range would normally be from 250,000 to 500,000 pieces, and 100,000 to 250,000 pieces with a filled resin. For hardened S-7 production tools, the range is a million pieces and above.
The custom quick change base will usually accommodate parts that are up to 2 1/2 inches wide and appoximately 8 inches long. Other factors, such as whether side actions are required or not, may also apply in determining if a part is a candidate for this type of base.
Dynamic Plastics understands that each customer’s needs are different, so we offer a variety of tooling options. Options include:
- aluminum prototype tooling for very low volumes
- aluminum or P-20 tooling for low volume production
- P-20 or hardened S-7 steel tooling for high volume production
For our customers’ convenience, we also utilize a custom quick change base that is similar to a MUD base type unit when possible. The use of this base allows us to machine the part shape directly into inserts that are loaded into the base for molding, which eliminates the need for a free standing moldbase for that particular part. This molding method saves our customers money by eliminating the cost associated with building a complete moldbase for each small part.
Yes, for the vast majority of projects Dynamic Plastics builds the tooling entirely in house. Use of outside sources is generally limited to specialty machining or certain secondary operations that we manage for our customers.
Although Dynamic Plastics does not recommend the type of resins to be used by our customers, we are happy to provide you with a basic resin guide to outline some of the more popular resins and some of their characteristics. If you would like additional information, we’ve included resin links in the guide that can direct you to technical help from the various resin manufacturers.
Yes, Dynamic Plastics works with a number of custom compounders. For custom colors that require us to have a compound developed, a one-time colorant fee is assessed to cover the color match and initial buy of colorant. From that point forward, the cost of the colorant will be included in the quoted part cost. In cases where you are able to use a color that we have already had developed and matched for the resin your part requires, the colorant fee may be waived.
No, Dynamic Plastics will accept any size part order. On orders where the volumes are low, a set up charge will typically be applied and will be noted on our quote. Set up charges cover the cost of having the mold set in the press and the time our operators spend establishing a process, and they help to cover the initial buy of material that is often required for low volume runs.
Dynamic Plastics has molding presses that range from 75 tons to 500 tons in clamping pressure. That allows us to mold parts ranging from the size of pencil eraser up to about 16 inches square, depending on the type of resin used. For parts that are too large for a 500 ton press, we have aligned ourselves with a reputable molding source in our area.
Plastic Design Guide
Dynamic Plastics is committed to the our customers' success. As part of that commitment, we offer this helpful design guide that identifies the design considerations that you should take into account when designing your plastic components. With this guide, you can avoid common pitfalls and achieve a successful design that more effectively meets your requirements. Click on any topic below to get more information.
Another problem concerning high stress occurs with molded-in inserts. The plastic melt heats the metal of the inserts. During the cooling stage of injection molding, the plastic part cools, but the plastic boss surrounding the metal insert is reheated by the heat from the insert. This allows the plastic to continue to shrink around the insert, causing excessive hoop stress* that will eventually cause the boss to crack. The better design and process would be to use ultrasonic insertion or a hot probe (such as a heat staking unit) after the molded part has cooled throughout.
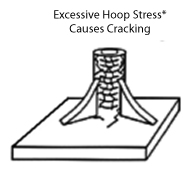
*Hoop stress: stress within the circumference of the boss.
In the design of injection molded parts, sharp corners should be avoided. Sharp corners act as stress risers or concentrators, reducing part strength and causing premature failures. Sharp corners may also affect plastic flow, producing parts with objectionable surface flow patterns.
Bosses & Ribs
Normal radius should be one quarter of the nominal part thickness with a minimum radius of .015 (i.e., 100 wall, 025r)
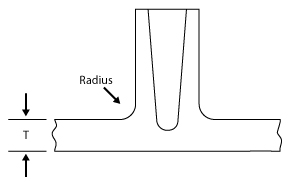
T = wall thickness of part Radius – T
Corners
The inside radius should be at least half the part wall thickness.
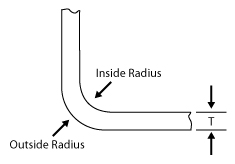
The outside radius should be equal to the inside radius plus the part thickness (i.e., 100 wall and inside radius of .050 equals outside radius of .150).
Bosses are used for locating, mounting and assembly purposes. There are boss design guidelines that must be followed to ensure the highest quality in molded parts. Again, one of the main points to consider is nominal wall thickness. Too many times, bosses are designed with thick wall sections that can affect the appearance of the plastic part and the final product.

T = wall thickness of part
t = wall thickness around a boss
Rule of thumb: the wall thickness around a boss design feature (t) should be 60% of the nominal part thickness (T) if that thickness is less than 1/8″. If the nominal part thickness is greater than 1/8″, the boss wall thickness should be 40% of the nominal wall.

Boss diameter, wall thickness, and height design parameters.
While boss heights vary by design, the following guidelines will help avoid surface imperfections like sink marks and voids: the height of the boss should be no more than 2 1/2 times the diameter of the hole in the boss.
Please observe the “60/40” rule (see above) for the wall thickness at the bottom of the boss.

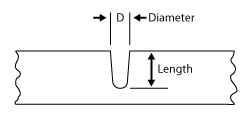
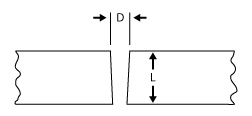
Holes are easy to produce in molded parts. Core pins that protrude into the mold cavity make the holes when the part is molded. Through holes in the molded parts are easier to produce than blind holes, which do not go all the way through a part. Blind holes are made by core pins supported on one end only. The pins can be deflected and pushed off center by the pressures of the molten plastic material during the molding process. A good rule of thumb: the depth of the blind hole should be about twice the diameter of the core pins up to 3/16″ and up to four times the diameter of core pins over 3/16″. The guidelines for blind and through holes are provided below.
Blind hole (shown with draft)
L = 2D for diameters less than 3/16″ dia. core pins
L = 4D for diameters more than 3/16″ dia core pins
Through Hole (shown with draft)
L = 4D for diameters less than 3/16″ dia. core pins
L = 6D for diameters more than 3/16″ dia. core pins
There are definite rules for the placement of cored holes in a molded part. If these minimum distances shown below are not followed, the holes will be egg shaped or the part will deform in the areas around the holes.
T = wall thickness of part
D = diameter of hole
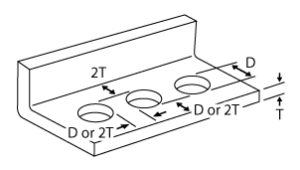
As depicted above, the distance from the edge of a hole to a vertical surface (i.e., rib) or the edge of a part should be twice the part thickness (or more), or at least one diameter of the hole. This same rule applies between holes—at least two part thicknesses or one hole diameter should be specified.
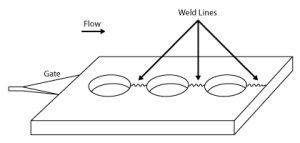
As easy as it is to make holes in molded parts, it does not come without some concerns for the strength of the part. For every cored or molded hold, there will be a weld line. The weld lines are caused by the flow of the melted plastic around the core pins. These weld lines are not as strong as the surrounding plastic material and may also detract from the overall appearance of the molded part. The part designer should consider these points when designing holes in a molded part.
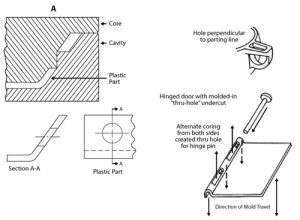
The coring of holes is easy when the axis is parallel to the parting line. But when holes and other features run perpendicular to the parting line, then retractable cores (or cams) are required. Split pins and cores (called passing steel shutoffs) can be used to create some of the features. The designer needs to be aware of the problems of side action cores and the added expenses associated with these types of molds. With a little understanding of how the mold opens and where the parting line will exist, these costly features can be modified. Rule of thumb: whenever possible, all design features should be incorporated in the same direction of the mold opening so that cam action can be avoided.
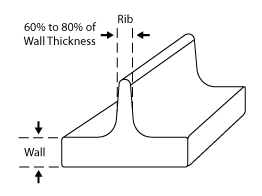
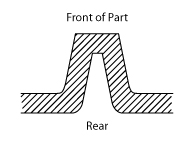
Many times, the stiffness of a part must increase because of the load applied to the part design. One of the easiest ways to cure this problems is change the part geometry by adding ribs. The use of ribs is a practical way and economical means of increasing the structural strength of a part. However, there are guidelines that govern adding ribs without causing sink marks or surface blemishes to your parts.
- Rib thickness should be less than wall thickness. A rib thickness of 60% to 80% of nominal wall thickness is recommended.

- To increase stiffness, increase the number of ribs, or “gusset plates”—another feature designed to strengthen the plastic part.

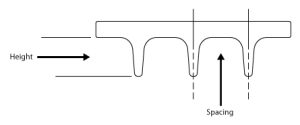
Height: maximum height of three times nominal wall thickness of part.
Spacing: minimum of two times nominal wall thickness of part between ribs. - For a given stiffness, it is better to increase the number of ribs and not the height.
- For thick ribs, “core out” the rib from the back. This creates a hollow space underneath the part and maintains a uniform wall thickness.
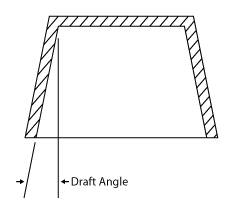
Plastic parts are always designed with a taper or draft in the direction of mold movement to allow part ejection or removal from the mold. Since plastics shrink when cooled, it is common for parts to shrink (or grip tightly) to cores. A good definition for a draft would be: the degree of taper of a side wall or rib needed to allow a molded plastic part to be removed from the metal mold. Without proper draft, plastic parts may be difficult to remove from the mold. A draft angle of 1/2 degree is regarded as minimum for most applications. Draft angles of 1 1/2 to 2 degrees per side are considered normal for plastic injection molding.
If there were only one rule for the injection molding process, it would have to be “maintain uniform wall thickness.” Here are some examples of problems associated with part designs that feature non-uniform wall thicknesses:
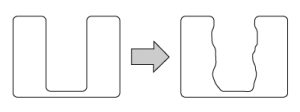
Sink marks due to uneven shrinkage
Sink marks result from a wall yielding to the still shrinking interior mass.
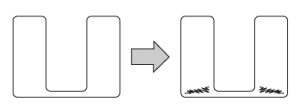
Stress due to uneven shrinkage
A part with non-uniform wall thickness will cool unevenly, resulting in high molded-in stress.
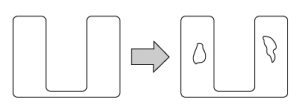
Voids due to uneven shrinkage
The already cooled section will not yield to the shrinking action of the cooling interior mass causing voids in the thick portion of the part.
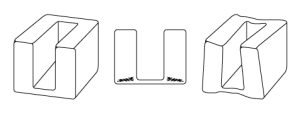
Warpage due to uneven shrinkage
Concentrated stress at the junction of high and low shrinkage areas may cause a part to warp.
There are several common mistakes made when replacing a metal product with a plastic molded part. The new part design must adhere to specific material and molding process guidelines. Several of the general guidelines are shown below:
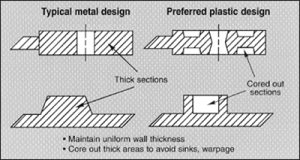
See guidelines for uniform wall thickness when coring out sections.
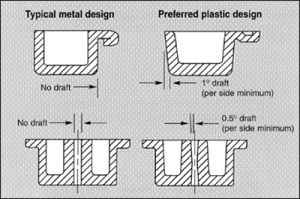
See Draft section for design specifications.
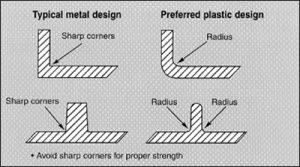
To ensure a quality final product, it is necessary to start out with quality components. Injection molded parts can be molded into high quality standards by focusing on these area of plastic technology.:
- Correct part design
- Accurate selection of material
- Proper plastic processing
Only by drawing on expertise from these three areas of plastic technology can a product designer create quality molded parts that maximize performance and are cost-effective.
This design guide deals only with the part design.

